Trace four things in order: a source must actually trigger; the next building must satisfy its own adjacency or range rule; the target must be legal; and its cooldown or waiting condition must be ready. Test the smallest useful chain before adding multipliers, Railroad or a relay.
Trace the chain, one link at a time
- Source: watch for the actual event. A nearby building that never triggers cannot power a relay.
- Position: read the live card and placement preview. A blue adjacency relation is not the same as an orange range overlay in curtaincall’s quick manual.
- Target: confirm the card accepts that terrain, building type or target. A card in the right-looking spot may still be illegal or inert.
- Time: check whether a cooldown or later milestone is still pending. Do not diagnose a waiting chain as broken from one quiet moment.
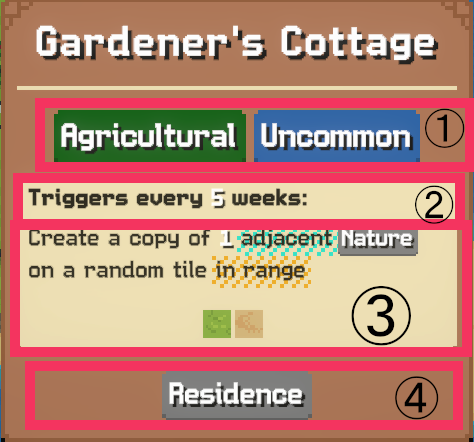
The same player manual describes same-building range restrictions and a Plaza exception; trust the current card text and preview for the exact placement in your run. A card you do not own is a missing-piece problem, not a position problem.
Build a small crop cycle first
In emgeal’s Quick Overview, Well helps neighboring crops and Picker’s Hut acts on a crop within its own shown range. Start with one crop, then check each relationship separately. The diagram shows roles and relations; it is not a tile map or a promise of exact spacing.
Schematic · inspect exact placement in the live preview
Place the Well only where the crop will actually be adjacent; place the Hut only where its preview includes that crop. Let the first cycle prove useful before extending adjacency with Railroad. If Well never appears, keep the crop cluster smaller and use its ordinary timing rather than claiming an equivalent replacement.
When it stalls, fix the right failure
Quick diagnosis · one symptom at a time
| What you see | Check next | Practical move |
|---|---|---|
| Key card never appeared | Current hand and Compendium | Keep the smallest useful chain; do not reserve the board forever. |
| Source fires; target stays quiet | Adjacency, shown range and legal target | Move the target or remove the invalid assumption. |
| Building cannot be placed | Terrain and same-building restrictions | Use the live placement overlay before rebuilding. |
| Looks connected but fires later | Source event and cooldown | Observe the next valid trigger rather than adding more relays. |
For rank climbing, review this chain at each milestone: can it fire repeatedly, and is there enough time to meet the next visible target? The game has ten named ranks, but the official listing and achievements do not give a current per-rank modifier table. Use the score and time displayed in your own run, then inspect a failed link before changing guilds.
Two special cases have their own guides: Railroad shares adjacency; Post Office relays a vertical trigger. Neither fixes an absent source event.
Mechanic examples here come from named Steam player guides checked Sep 29, 2026. Their relations are useful for diagnosis; current card text and placement preview decide the exact legal position.